Tuesday, 14 May 2013

EOTD - Featuring Dior Backstage Mono Eyeshadows

Hello!

So today I bring you an eye of the day look that my friend who works on the Dior counter next to me did for me about 9 weeks ago now! I haven't been able to get the photos up so it's a little bit later than I wanted it to be but oh well! Now then, the one really great thing about working in cosmetics is that you can have a play about with all the new shiny things that come in as soon as they arrive! It's like Christmas for all of us when the new collections come into store! The Dior ones are usually the most exciting just because well....it's Dior you know? (Although the new Lancome palettes were worth the wait too!)

Anyway, the new mono shadows came out with the backstage collection and we all had fun swatching them like crazy! I had some spare time after work and volunteered myself for a trial of some of the colours...it's a hard job but someone has to do it right? Haha! There are quite a few colours to choose from but we decided one the silvery white, pink and purple because I really wanted to try the sparkly white one and those colours are just drying to be used together!

These eyeshadow can be used wet or dry and look stunning either way, they just look a bit more intense with a wet brush. I do think that pretty much any solid eyeshadow can be used wet, just spray the brush first with a tiny bit of water and most should be fine I think. I may be wrong but any I've tried it with have been fine (please don't sue me if you try it with a palette and it doesn't work though ok?!)


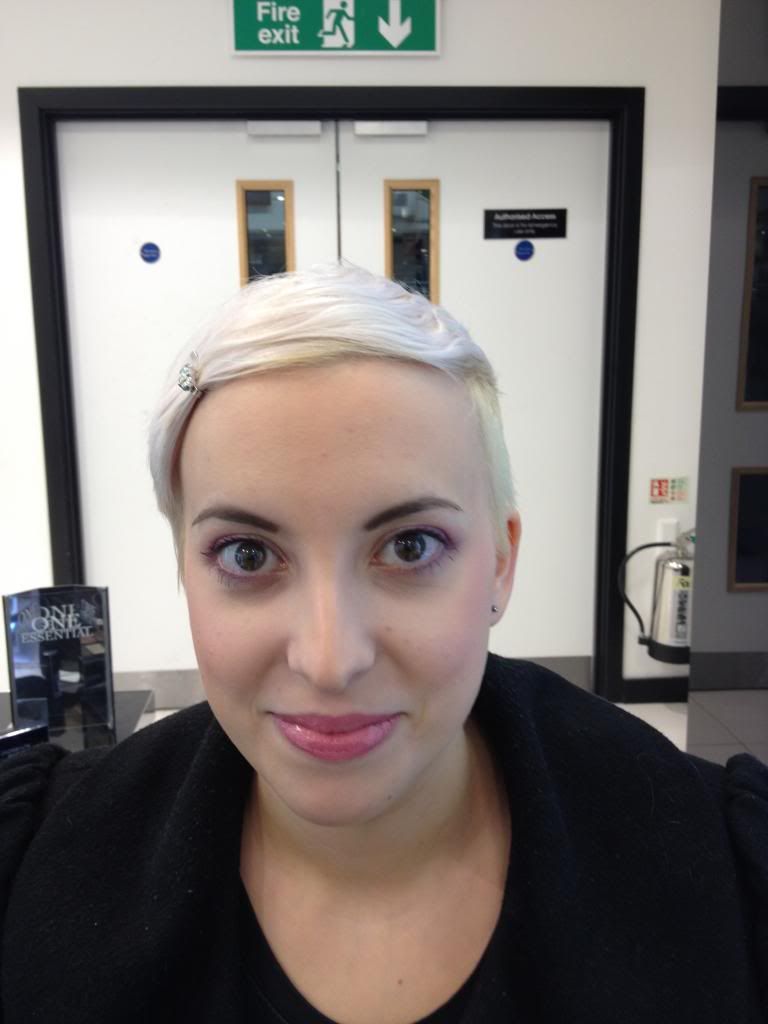
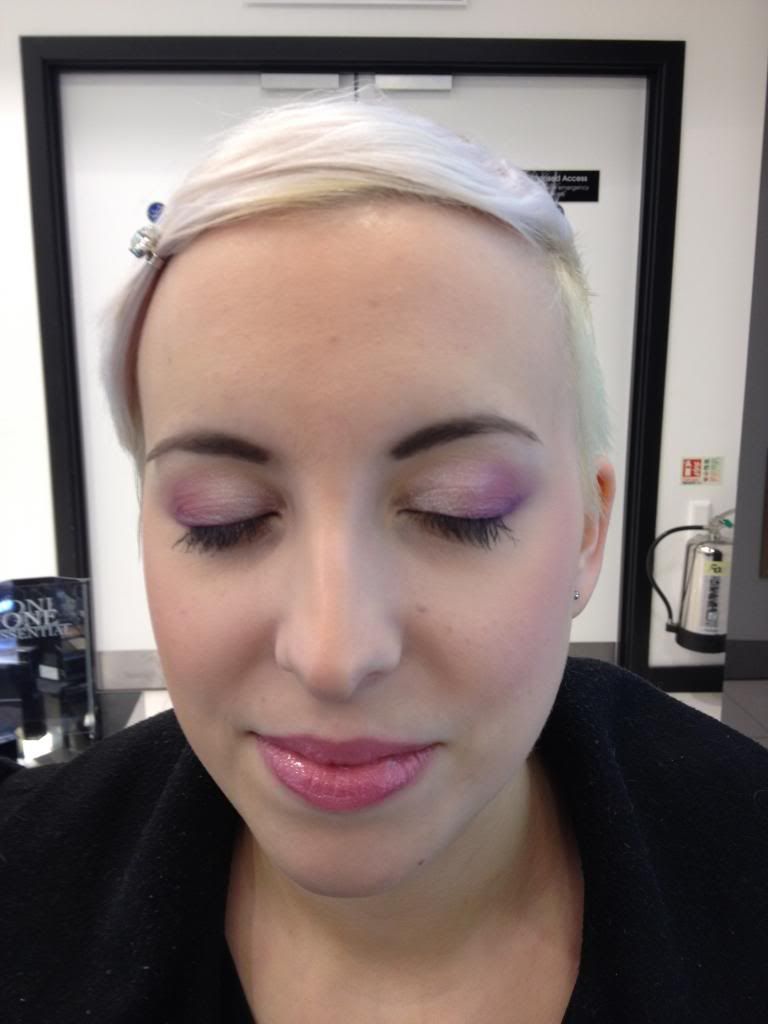
Here's a lovely picture of my face with my eyes open so you can barely see any eyeshadow them at all! Note the sexy pinned back fringe, fire escape in the background and slightly red eyes from where I'd had a mini meltdown earlier in the day! You can also see where Toyah has used the purple as an eyeliner underneath my eyes - This has to be one of my favourite things at the moment, using  powder shadow as my eyeliner.


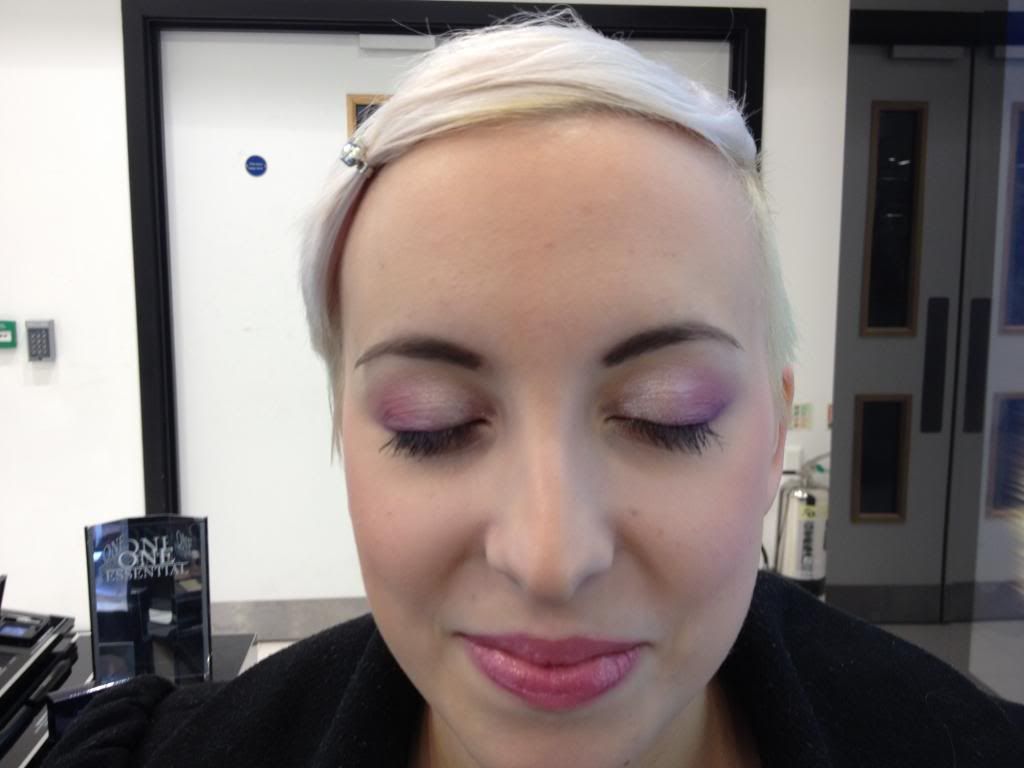
Eyes closed shot so you can see the way they've been blended ever so nicely! 


Slightly closer look so you can see the detail a little better. I like the way Toyah used the purple as an eyeliner on the top too. It's subtle but gives a bit of definition too. 

Products used:
  • Dior Skin Nude Foundation (The only liquid foundation i will use at the moment, and only when Toyah does my make-up really...unless it's for a night out and then I have to put my trusty BareMinerals on still!)
  • BareMinerals Dark Blonde/Brown Eyebrow Powder (LOVE this powder so very much!)
  • Dior Universal Bronzer in Number 2
  • Dior Rosy Glow Blush
  • Dior Mono Eyeshadow in #006 Swan (Sparkly White)
  • Dior Mono Eyeshadow in #887 Bow (Pink)
  • Dior Mono Eyeshadow in #176 Lilas Mitzah (Purple)
  • Dior Iconic Overcurl Mascara
  • Dior Addict Lipgloss in #13 Etoilee (I think! It's the clear sparkly one)
Now then, these are super beautiful colours but at £22.50 per shadow, I simply can't afford to buy those 3 colours (I don't think I could really justify one to be honest!) I have a palette that pretty much has all 3 colours in it anyway, which is my BareMinerals A-List palette but the white colour isn't quite as sparkly really....so at a push I could probably talk myself into buying that one (if I ever had £22.50 spare...) It looks very pretty with a grey/black smokey eye look too! The other two are very pretty, but I personally think you can probably buy the same sort of colours for cheaper (Seventeen have some fab little mono eyeshadows that contain a very similar pink and purpler colour to the Dior ones) but I seriously haven't seen another white sparkly eyeshadow quite like the Dior one, without it being a loose powder of course. The downside to the loose powder ones, for me, is that the sparkly tends to spread across the eye and you can't really use them wet like you can with a pressed shadow. 

What do you guys think about the Dior Mono Wet/Dry Eyeshadows? Have you played with any of them at all, if so which ones are your favourites? 

Very quick side note for you guys - the clear sparkly lipgloss is very pretty and looks nice on it's own but can also add definition to any lip colour at all without changing the initial colour....however, the Dior one is £22....and you guys know me, I love finding cheaper alternatives because I'm not made of money at all! So low and behold, here is my alternative for you....it's from H&M and cost £1.99!! It's exactly the same, if not actually a little bit better in my opinion. It has a bit of a subtle fruity flavour to it as well which is nice. I don't know if it has a name but it was just in the make-up bit of my local H&M and was also in the two others I visited over the next few days (I didn't just go on a H&M store tour by the way...) I highly recommend this lipgloss if you like the Dior one but can't afford the price tag. 

Until next time,
xoxo


Sunday, 12 May 2013

Review: A Few Illamasqua Nail Polishes

Hello!

So today I bring you a couple of nail varnishes from Illamasqua that I brought up in London back in February as a birthday treat to myself! I really wanted to buy some make-up but at the time I couldn't justify it due to thinking about how I can't wear it every day because of my job. However, I would definitely buy something next time I was in a store if I really loved it, mainly because there isn't a store very close to me (I think the closest is London which is the one I went to) but also because I've seen loads of things on their website but would like to play about with the make-up before buying it online.

So the 3 nail polishes I picked up were ones I just happened to see in store that really caught my eye - they were basically impulse purchases! The girls in the Beak Street store that I went to were really lovely and helpful. They even offered me a bit of card to try any/all of the nail polishes out on if I wanted to, which was really helpful....and helped sell me on the nail polishes I picked!


The first one I picked was Glitterati which was so pretty but the girl was quick to point out that it only came in a duo set with Veridian. I don't really need another teal nail polish so was tempted to say no....but I just couldn't resist that beautiful glitter polish! I'm so glad I didn't say no to this one!


The other polish I picked up was from their spring collection I think. It's one of the speckled nail polishes in the colour Fragile. I really loved all the colours but chose this one because blue is my favourite colour and I thought this one looked more like an egg than the other colours.


The back of the bottles have standard instructions about how to apply it. The fact that it comes with 15ml of product in there is pretty good I think. Some polishes only come with 8 or 10ml so it's good to have so much product in a bottle (especially considering how expensive these polishes are really!)


This shows that each Illamasqua bottle comes with a removable square lid, which I find easier as I find using a polish with a bulky lid is a bit tricky for me.But if you prefer a bulkier lid, the square part stays on quite well too. 


The brushes are quite thin, which is a pro and a con. I find that bigger brushes are easier for quick application, but thinner brushes are a bit more precise and good for nail art. 


Picture of Glitterati with the flash on to try and show the pretty glitter pieces in it!


And here are the lovely swatches! These are all one coat swatches which shows how good the coverage is with just one coat of each polish! I was SO impressed with these and so happy. I would definitely buy more (I have my eye on a couple of the Rubber Brights colours on the kiosk at work...) I was especially impressed with the teal one as I have some teal polishes that are so watery that it takes about 6 coats for full coverage. Fragile and Glitterati are both really good coverage wise but I would do two coats for maximum cover. The glitter bits weren't too annoying to place either which was good - I didn't have to try and move it around loads before the polish dried. And speaking of drying time...these were really quick to dry! I used my trusty Sally Hansen Top Coat over these when they were on my nails and it made them all super shiny and pretty and made the glitter in Glitterati show up so nicely - I like the way that one is glittery without being too intense. I think Fragile actually looks better with a matte top coat on as it looks more like an egg shell with a matte top coat. I'll be honest, I wouldn't have picked Veridian up given the choice really. If I'm going to spend a hefty amount on nail polish, I want to make sure the polish is something exciting and different. At the end of the day, I have many teal polishes and recently got a Barry M one that is almost as good as this one (granted I've not found one with such good coverage in one coat though...)


Overall thoughts -

The Good:

  • Super good coverage straight away
  • Quite different colours
  • Fairly easy to remove despite being glitter coats!
  • Last for ages (5 days with no chips, which is impressive for me!) on my nails (with a base coat and top coat)
  • Seem to be easy to buy online, plus the website is generally pretty good for accurate swatches
The Bad:
  • Tad expensive for a nail polish (£13.50/£14.50 each usually - £24 for the duo...although I paid £27 for mine in the shop a few months ago - which takes my spend to £40.50 for 3 nail polishes....)
  • Shops don't seem to be anywhere down south really so you can only get them online - although online they do a pick your own bit where you can choose 3 polishes for £30, which saves you a bit of money which is always nice!
  • Not the biggest range of colours for a brand (although I personally feel there are enough for a make-up brand and the choice is quite varied for my liking but some people may be annoyed that there aren't hundreds to choose from!)

I must say, I really liked these polishes and would definitely buy more if I thought they were different enough to justify the price (I'm not going to go and buy a standard polish colour that Barry M also do you know? I mean...maybe if I was super rich I would, but even £2.99 on a polish I don't really need is difficult to justify let alone £13.50!) This is probably the first "High End" nail polish that I would really recommend to my friends (For example, I'm not a Nails Inc or Dior fan at all as I find their polishes have no lasting power for me at all) and if I had the money to treat myself I would definitely consider buying more of these beauties....when Debenhams have their mega week next week (starting Tuesday I believe!) I'm going to be very tempted to pick up a Rubber Brights colour with 10% off....

Have any of you guys tried any Illamasqua nail polishes? Any you recommend or any I should stay away from? Can anyone recommend any of their make-up as I really want to try it but don't know where to start really...any cult products to try??

Until next time,
xoxo


Tuesday, 7 May 2013

My Current Make-Up Storage

Hello!

So I recently got some new make-up storage and thought I would share it with you. I need my make-up storage to be portable because I tend to get ready in different places in my room as I'm no good at getting ready in a rush at my desk for some reason! I would really like some storage drawers for proper storage but think I'd prefer them for my nail polish (seriously need some good storage for my nail polish!!)


So here is how I'm keeping all my make-up at the moment. I actually keep some of it in the drawers next to my desk (my Naked palette and Oz palette don't fit in anything else) but everything else is in these bits. I have 5 main storage units, 4 of which keep my everyday work make-up in. The box at the back has everything I can't wear to work (mainly lipsticks!) There was a lot more but I recently had a bit of an overhaul and gifted loads of stuff to one of my friends who doesn't have much money to spare for herself on make-up but still loves it (not in a charity way....more in a "Dude....I'm not going to ever get to use this, do you want it before I give it to charity?!" kind of way! I prefer giving things to friends first as that way I know it's going to good home!) 


(Apologies for the dirt brushes! I'd washed them 2 days before this I swear!)

My Mum brought this for me as an Easter gift instead of giving me chocolate as she was apparently tired of hearing me complain about never knowing where I'd put my brushes each day! Haha! She got this in Lakeland for around £10 - £15 I think. I was surprised that she got it in Lakeland to be honest! It's got 3 compartments on one side and one big compartment on the other with 6 elasticated sections for brushes on that side too. And if that weren't enough there is a little drawer underneath that holds all my extra brushes that I don't use everyday - there's a lot of extra eyeshadow brushes in there at the moment! 

So in this one I keep the brushes I use everyday in there - Foundation, Bronzer, Blusher, Concealer and Eyebrow, my different foundations - Loose and Ready, my two eyebrow shades (ELF eyebrow kit and the dark matte shade from the Sleek Storm palette), a handful of my BareMinerals Ready eyeshadow palettes and my mini Mineral Veil. In the other side I keep my eyelash curlers, mascaras, a few eyeliners, a few other brushes that don't fit in the brush bit or the drawer and my Dior Universal Lipliner.


This is another little gift my Mum got for me from Lakeland. Again I think this was around £10. My only issue with these drawers are that they get a bit grubby a bit too quickly for my liking! But they go really well with my room design and also fit really neatly in the chest of drawers next to my desk....so I have a set of drawers in a set of drawers! 

In here I keep: my concealers, bronzers, blushers (spilling into 3 drawers now!) and my highlighters. 


This box I got from a BareMinerals Christmas set and folds open easily to reveal all my loose BareMinerals eyeshadows. I've got them upside down so I can see which ones are which easily....however this does mean that a lot of the product ends up in the lid so you have to be careful when opening them. The little pots are from another Christmas set and fit very nicely in here....I am running out of space though so maybe I should stop buying eyeshadows!


This is the Superman tin from in the first picture and it contains all my BareMinerals lip products and the White Hot palette that I got for Christmas too (It's the only place to put it at the moment) My friend got me this for Christmas as I bloody love Superman and I absolutely love keep my lipsticks in it as it brightens my day up everyday! Plus there's room for all the new Moxie bits that are coming out next month ;) Can't wait for new lipsticks!!


The lilac box at the back was given to me for my birthday a few years ago by my ex-boyfriend. It was a super thoughtful gift and I hadn't actually mentioned wanting a case like this, so the boy did good with that present! It folds out to reveal a big space at the bottom and two small shelves on each side, the bottom shelf with one long compartment and the top shelf with 3 smaller compartments. 

In here I keep:

Bottom Compartment - False eyelashes (in the pink glossybox, eyeliners (in the gold pencil case), Spare BareMinerals bits from various kits and a few other bulkier bits including my Sleek Acid Palette.

Left side - lipsticks and lipglosses from various brands.

Right side, bottom shelf - Dior Nude Shimmer Highlighter, brush shampoo, smaller eyeshadow palette and a lip balm that doesn't fit in the other side!

Right side, top shelf - Various eyeshadows, a Ready foundation that I think is too yellow for me and for some reason, a pack of matches underneath it! (I brought loads from sainbury's a while back and seem to have put them all over my room so I always have a pack to light my scented candles....I tend to lose them otherwise!)

How do you guys store your make-up? Any ideas on nail polish storage for me?? Anything you've spotted in my stash that you'd like a review on?

Until next time,
xoxo


Review: BareMinerals Neutralizing Prime Time

Hello!

So I went up to London the other day for a gig and decided to pop into the BareMinerals store in Covent Garden to abuse my staff discount a little bit - I get 50% off in BareMinerals stores, which means I can get new products for cheap! Yay! I picked up a few other bits as well (a Multi Wrinkle Serum for me and a Redness Remedy for my Mum....plus a new lipstick for myself too....) The Neutralizing primer is a new product that launched last week and I've been waiting on my tester at work to try it out....but it didn't come in before I went on holiday. Boo. Anyway, this meant that when I saw it in the store I just decided to grab one on a whim as I was running out of my primer anyway.

The basic premise of this primer is: (from the BareMinerals website) "With its colour-correcting yellow base and light-reflective pigments, this innovative foundation primer immediately neutralises the appearance of discolouration, uneven skin tone and redness for brighter, younger-looking skin". Feel free to skip to the end for a summary of the good and bad points of this product if you don't fancy an in depth review!


A quick bottle shot to show the fact that it's in the same sort of pump bottle as all the other BareMinerals primers. All are 30ml unless you buy the giant sizes that occasionally pop up on counter/on QVC (this one is currently on a giant size offer on the QVC website here) My only issue with the packaging is that they all look pretty much the same (except the Oil Control one at the time of writing - it's in a white box instead...) so if you aren't thinking, it's very possible to pick up the wrong one and only notice when you get home. It's a minor issue but one I've encountered a few times on my counter! (You may be able to see a smudge of yellow on the side of the cap...I have used this a few times so it isn't just a "first thoughts" review)


Here's a quick shot to give you nightmares....my face with no makeup! To be honest, if you've read my blog before, you're probably used to this beauty of a face popping up every now and then to scare you! Look at those bags under my eyes....and that blemish on my chin, not to mention the uneven eyebrows that I'm having to sport at the moment ...mmm...sexy! (I was determined to have an arch put in to my eyebrows by the way but it turns out I can't do it with one of them....now I have to grow the other one out instead! The odd things we put ourselves through ay?!) Anyway, this shot was to highlight the fact that my face does have uneven skin tone, dark circles and a bit of redness round my nose/on my cheeks/between my eyebrows. It isn't super intense redness, but it's enough for me to be aware of it. I do also suffer with dry skin on my cheeks (allergic to my own tears you see...so even if it's tears of happiness, it'll bugger up my skin for weeks!) that can occasionally go a bit flaky and my foundation will settle a little bit in it by the end of the day.


Product shot! I promise you that is the primer and nothing gross (I'm sure none of you were thinking that...but now you are right?!) Anyway, you can see it almost looks a tiny bit runny compared to the original silicone based primer...and that's because it's a water based one instead! I actually prefer this as I used to find that silicone one a bit...heavy almost - something I only realised after using this one really. The colour is quite an intense mustard yellow and when you first put it on...well...it was a bit "Oh....well I look very Simpson-esque..." so the key to this primer is blending it out. It took no time to blend out though so it's not like that was a hassle at all, but I feel you should be aware that it is highly pigmented to start with! I used this one pump for my whole face and then went back for a tiny bit more for round my nose area to really help with that bit of redness. Now then, I don't think this will get rid of all extreme redness completely but it certainly helps and awful lot (I tested it on my Mum who has quite bad redness on her cheeks) I actually found that I would've been comfortable leaving the house with just this on, which I thought was a pretty good testament!! I did test it with my foundation over the top too and I actually used less foundation than normal as I already had a bit of coverage on my redness, so I didn't need to put as much on which means my foundation will last longer now too! Bonus! (I will be putting a review up of my foundation in the next few days so you guys can see what it looks like with foundation over the top - I didn't want to bombard you with too many photos in one post!) 


So in this picture I've put the Neutralizing Primer on the right side of my face (which is the left side in this photo right?? Quick poll - how do you describe that in your blog posts??) If you compare to the picture above, you can see that the dark circle under my eye has diminished an awful lot, the redness round my nose/on my cheek is practically gone and even the blemish on my chin has been dulled down! (And that blemish is really red bastard in the flesh!) All in all I'm really glad I picked this up on a bit of a whim to try. It's definitely the best primer I've ever used and my original silicone based primer will be taking a back seat from now on until I run out of this one. I just prefer the feeling and correcting tone of this one. The only thing I will say is that it does have a rather odd smell to it. I put this down to the iron oxides that are in it, but still....it's not a great smell to have near your face first thing in the morning. It's almost a slightly sterile smell...which I guess some people might like, but I'm not a fan! As for the claims that this primer also helps to brighten your skin, well, I genuinely think it does which is another bonus!

Overall thoughts -

The Good: 
  • Really helps to neutralise redness
  • Helped with my dark circles
  • Made my skin look brighter
  • Thinner consistency which felt lighter
  • Left my skin feeling hydrated all day
  • Non-sticky
  • Didn't have to wait ages to put my foundation on over the top
  • Made me feel confident enough to go out with just this on
  • Didn't clog my pores at all
The Bad:
  • Possibly a bit too pricey for people on a tight budget
  • Odd smell that might be a bit off putting to some people
  • If you've got slightly wet hands, the pump can be a bit annoying (a minor fault, but still!)

Overall, the good definitely outweighs the bad with this primer for me! I think some people might be expecting miracles with this primer, but it's only designed to help neutralise redness and not hide it completely. I also think a few people may be a bit disappointed that the consistency isn't quite the same as the original, but for me that's a bit of a plus. I paid £10.50 for this primer but would definitely buy it at full price since trying it, which is £21 for 30ml (although I would always wait for a discount day in one of the many stores that BareMinerals is sold in! I know Debenhams have got a Mega Week coming up next week - 10% off cosmetics! I'm a sucker for discount!) 


So what do you guys think? Does it make enough of a difference to my face for you to want to try it? Are you a fan of any other primers that you think I should try?

Until next time,
xoxo

Monday, 6 May 2013

NOTD: Rimmel - Too Cool To Tango

Hello!

I'm FINALLY on holiday from work and my Fake-Dad, John, has managed to sort me out a new (old) laptop to use (and hopefully not destroy!) so I'm going to try and blog as much as possible and hopefully upload some YouTube videos whilst I'm off too. So I'm starting off with a quick nail of the day with a new polish I brought a last week after payday. I've been looking at this one for a while now and just decided to treat myself after payday because I could and I wanted to!


I really like Rimmel nail polishes and own an awful lot of them now. I got this one because I really like the colour as it's really summery and is bright without being too in your face. I have a Barry M one called "Blueberry Icecream" that I thought was actually the same as this but, luckily, this one is more of a very blue toned light teal.....if that makes any sense?? I'm basically justifying this buy because I'm so in love with this colour! The formula is really nice too. I pretty much could've gotten away with one coat of this but two gave a really solid colour. I would really like to try this with a matte top coat too. This will probably be one of my new go to Summer colours! I really like the brush in this one too as it's quite wide and makes application much easier and practically streak free, which is always a bonus. 

So what do you guys think of this colour? Do you have any Summer nail colours that you can recommend?

Until next time,
xoxo